Monday, August 10, 2009

Florals on a budget - cheap flowers

When I was planning our wedding, I knew that I had to DIY the florals. Florists just charge way too much for stuff I know what do. Still the flowers and vases themselves can be costly. I did a fair share a research to find well priced flowers. What I found was that online wholesalers are no deal. I actually got better prices getting quotes from local florists (plus no delivery fee). For my own wedding, I used a local flower wholesaler. Miami, as the gateway from the Central and South American floral farms, is filled to the brim with flower wholesalers. But most large cities have flower wholesalers that will sell to the public. If not, get a quote from your local florist and make sure to ask for a better price since they aren't arranging them for you. Other well priced places include Costco (call and place the order with your local store) and your local grocery store.


Now on with doing your floral centerpieces on the cheap. What I have learned is that cheap flowers look, well, cheap when arranged with other cheap flowers. But when showcased on their own, they can be the stars and become stunning. See, for example, the following....


Carnations credit


Poms or mums
credit


Even baby's breath

The extra plus for working with a monoculture of flowers is that your save time dealing with the placement of specific flowers. Instead there is more emphasis on shape, color, and texture


Next is the vessel. Buy cheap vases. Dollar Tree and Ikea have great ones. You can always cover them in paper and ribbon for pizzaz.


Avoid buying online, they will get you with expensive shipping.

Or just make your own vases, by repurposing containers.

Ball canning jars

credit

Or cut some of your wine bottles. For tutorial see here

credit


Also, for an additional bit of decor, you can always add a punch of color underneath the vase. like these from etsy seller darlingdamask


Sure, you could buy them or always make these yourself. But time and money can be an issue (or sewing prowess in my case). But, why not rent awesome napkins from your local linen company. They usually rent for 50 cents each and come in a range of colors, textures, and fabrics. If you aren't renting anything else from them, pick them up and just mail them back.

I hate to be a stereotype

But I have totally gained weight from our wedding. The biggest culprit is probably eating out for convienence sake. Well, I have been trying to make myself make and not buy the foods that are probably the worst for me. These would include: sweets, pizza, and bread. My reasoning is two fold - (1) If I have to make it, I won't eat it so often, and (2) If I make it, I can control the calorie content and portion.

So without further ado, I present to you my pizza recipe that is tried, tested, and true.

I make my dough in a bread machine - yes, I am lazy.

Pizza dough
Ingredients
3/4 C lukewarm water
2 C flour (bread or all purpose)
1 tsp salt
1/2 tsp sugar
1 1/2 tsp bread machine yeast (2 tsp for regular)

Instructions. Put all of the ingredidents in the bread machine in the order listed. Use the dough setting on your machine. Once finished, knead, by hand for 1 minute. Let rest, covered with a cloth in warm area for 20 minutes. Then form pizza, either by hand or rolling pin. Place in a pan sprayed with oil (I use my Misto with olive oil), and sprinkled with cornmeal. Let the formed dough, rised covered for another 25 minutes.


Pizza Sauce (adapted from Cooking Light)
Ingredients
7 tbs water
2 tbs chopped fresh basil - This is very important!
1 1/2 tbs extra-virgin olive oil
2 tsp dried oregano (or tsp fresh)
1 1/2 tsp sugar
1 tsp minced garlic
1 (14.5-ounce) can petite-cut diced tomatoes, undrained
1 (6-ounce) can tomato paste

Instructions. Combine all ingredients in a medium bowl; stir with a whisk.


Pizza Instructions
Spoon sauce onto prepared dough. Make sure to not smother with sauce, as the pizza will become soggy. Place you favorite chopped toppings on top of sauce (bell pepper, onion, and fresh tomato are my favs), and cover with mozzarella cheese (part skim for me). Sprinkle with salt and pepper, if needed. Bake at 400 degrees for 18-25 minutes.


= happy husband

Sunday, August 2, 2009

Waffles for my sweetie!

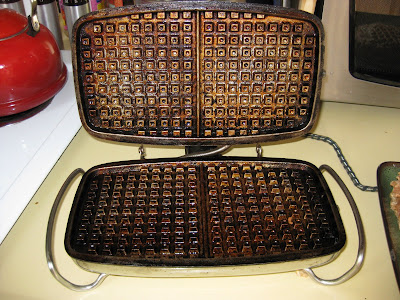
Ok, so my new husband is not a fan of breakfast, which is only my most favorite meal of the day. But there are a few exceptions. He loves my pancakes, frozen Eggo waffles, and bagels with cream cheese. Well, when I happened upon a good recipe on CookingLight.com, I decided that it was high time to put the waffle iron, which I inherited from my dear grams, to use.

The iron, albeit rather old, worked out great and the waffles did not stick - not even the first batch! The recipe listed below is a little fine tuned to suit my taste, since I often like to eat them dry - so some more cinnamon and more sugar was needed. All in all, they were a snap to make and now we have waffles for the rest of the week. I just froze them individually. They have a texture similar to Nutri-gran waffles but with more flavor and heartiness that fill you up. One is just enough for me in the morning.

A baby waffle made from the last of the batter.


Bannana Cinnamon Waffles

Makes 12 waffles

Adapted from Cooking Light

Ingredients
1 cup all-purpose flour
3/4 cup whole wheat flour
1/4 cup ground flaxseed - grind in coffee grinder
3-4 tablespoons sugar
1 1/2 teaspoons baking powder
2 teaspoons ground cinnamon
1/4 teaspoon salt
1 1/2 cups fat-free milk
3 tablespoons butter, melted
2 large eggs, lightly beaten
1 large ripe banana, mashed
Cooking spray

Instructions
Spoon flours into dry measuring cups and level with a knife. Combine flours, flaxseed, and next 4 ingredients (through salt) in a medium bowl, stirring with a whisk.

Combine milk, butter, and eggs, stirring with a whisk; add milk mixture to flour mixture, stirring until blended (don't over mix). Fold in mashed banana.

Preheat a waffle iron. Coat iron with canola oil from your Misto (don't use Pam or other bottled stuff - it will gunk up your iron). Spoon about 1/4 cup batter per 4-inch waffle onto hot waffle iron, spreading batter to edges. Cook 3 to 4 minutes or until golden Remove waffles by gently lifting the edges with a fork and then pulling the rest with your fingers. Respray the iron plates and repeat procedure with remaining batter.

Nutritional Information
Per two waffles:
Calories:215 (31% from fat)
Fat:7.4g (sat 3.3g,mono 1.9g,poly 1.4g)
Protein:7.3g
Carbohydrate:31.1g
Fiber:3.4g
Cholesterol:65mg
Iron:1.9mg
Sodium:205mg
Calcium:133mg